Introduction

 Citrix XenServer 6.0 now comes with templates for Ubuntu 10.04 LTS. This means that we can now provision Ubuntu servers without having to go through the trouble of cloning and customizing the Debian templates. However in this article we will go one step further and automate the Ubuntu install process up to the point when puppet is ready to take over and do the rest.
Configuration
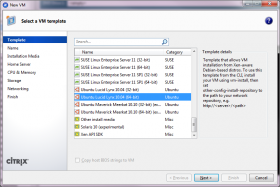
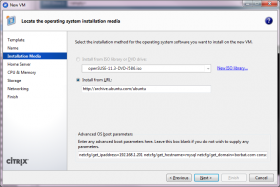
The first parts of the XenServer new VM wizard allow us to select a template, architecture, name, and description. For the most part they are self explanatory. Just make sure that you select one of the Ubuntu Lucid Lynx 10.04 templates. This tutorial will address the "Locate the operating system installation media" step where we can specify software repository and boot parameters. These boot parameters will be passed to the Ubuntu installer.
To install Ubuntu without needing more human intervention we will need to feed the answers to the installers questions ahead of time. If we provide it enough information the installer will run and finish without requiring any input from us. There are four major requirements for this process - a software repository, keyboard and locale, network configuration, and a preseed file.
Software repository
The software repository can be any repository with all of the packages necessary to perform the installation. If you're planning on deploying many VMs, it's highly recommended to host a mirror on your local network. This way you will save on network bandwidth and installation time. However for this article, we're going to use the Ubuntu hosted repository located at http://archive.ubuntu.com/ubuntu
Keyboard and Locale
Just providing the software repository to the XenServers VM provision wizard is enough to install Unbutu. If you've tried this before then you know that the first questions the Ubuntu installer asks will relate to your keyboard type and locale. Since our goal is to automate this process, we're going to provide answers to these questions as boot parameters. The ones here are for a US English configuration. There are many more supported, and you can find more documentation on locales in the Ubuntu Community Documentation.
console=hvc0
debian-installer/locale=en_US
console-setup/layoutcode=us
console-setup/ask_detect=false
Network connection
Next, the installer asks for the network configuration. If you have a DHCP server then you need to just provide the interface, hostname, and domain settings. For a static connection you will also need to provide the network address, netmask, gateway and nameservers. These parameters will configure mysql.borbat.com with a static IP address 192.168.1.201 utilizing the memorable 4.2.2.1 nameserver. The netcfg/get_nameservers parameter is plural, so it probably supports a comma separated list. I haven't tried this yet, but if it works please let me know and I will update this article.
interface=eth0
netcfg/get_hostname=mysql
netcfg/get_domain=borbat.com
netcfg/disable_dhcp=true
netcfg/get_ipaddress=192.168.1.201
netcfg/get_netmask=255.255.255.0
netcfg/get_gateway=192.168.1.1
netcfg/get_nameservers=4.2.2.1
Preseed configuration
Now that we've given the Ubuntu installer enough parameters to set the locale and get on the network, we can provide it a URL of a preseed file that contains the rest of the configuration. The preseed file is a text configuration file with a list of parameters very similar to what we have supplied at boot time. There are many possible parameters that will allow you to customize the installation and the full guide is available in the Ubuntu Preseeding documenation.
preseed/url=https://stan.borbat.com/downloads/ubuntu-puppet/install/preseed-10.04-LTS-clean.cfg
After Ubuntu installer is able to connect to the network, it will attempt to download this file and use the configuration to complete the rest of the installation. For this tutorial I hosted my preseed file on an Apache Web Server at the following URL https://stan.borbat.com/downloads/ubuntu-puppet/install/preseed-10.04-LTS-clean.cfg. This could be any web server as long as it's accessible on the network using the parameters that you specified above.
Installation
All of these parameters need to be put together into a single line and separated by spaces like in this text file. The end result can then be pasted into the Boot Parameters text box of the VM installation wizard.
The following steps will ask you to choose a home server; configure the network adapters, disk drives, and resources. It's important to make sure that the network card configuration corresponds to your boot parameters. If you configured eth0 in your boot parameters then you need to also make sure that the first network card is on the correct network segment to access the repository and the preseed file.
When the wizard is finished, the resources for the VM will be allocated and it will be spun up. You can monitor the installation progress through the console. If everything was configured correctly then the installer will not ask any questions during the installation and will eventually end with your VM login screen. By that point it would have also connected to your puppet server and presented a new authentication certificate.
Customization for Puppet
Yet one important question probably remains on your mind. How is the new installation aware of my puppet server? The answer lies in the preseed file. So now we will go through it and help you customize it to fit your environment.
Preseed File
The first section specifies the package repository. This setting should be the same as what you provided to the XenServer wizard. It's just broken up into two parts, the hostname and the directory.
d-i mirror/country string manual
d-i mirror/http/hostname string archive.ubuntu.com
d-i mirror/http/directory string /ubuntu
d-i mirror/http/proxy string
The next section specifies your clock settings. Although often overlooked, it's important to set this and avoid debugging issues in the future. Some hardware such as HP Blades have issues with clock drift. Although they can be addressed with proper kernel parameters, it's simpler to just provide a time server and move on to bigger things.
d-i clock-setup/utc boolean true
d-i time/zone string US/Eastern
d-i clock-setup/ntp boolean true
d-i clock-setup/ntp-server string 0.pool.ntp.org
This following section describes how the drive is partitioned. Here we're telling the installer to use the "atomic" configuration. The full drive will be allocated to the root partition and formatted with ext3. The rest of the settings are to answer the standard questions that the installer will asks. Is it ok to overwrite? Since we're provisioning a new VM, the answer will always be yes.
d-i partman-auto/method string regular
d-i partman-auto/choose_recipe select atomic
d-i partman/default_filesystem string ext3
d-i partman/confirm_write_new_label boolean true
d-i partman/choose_partition select finish
d-i partman/confirm boolean true
d-i partman/confirm_nooverwrite boolean true
Although I choose to leave all the user and authentication configuration to my puppet scripts. This section allows me to specify a default root password and to decline to create a new user. In this configuration, the root password is set to be "mypassword". It's simple, but not always secure enough. For instance, an attacker could find my preseed file and read my default password in clear text. This would give him an opportunity to sign into a newly provisioned server before puppet has a chance to update the security configuration. Alternatively you could provide a hashed password here.
d-i passwd/root-login boolean true
d-i passwd/make-user boolean false
d-i passwd/root-password password mypassword
d-i passwd/root-password-again password mypassword
#d-i passwd/root-password-crypted password [MD5 hash]
d-i user-setup/allow-password-weak boolean true
d-i user-setup/encrypt-home boolean false
The last section allows us to choose packages and most importantly specify a post-install script. I am installing a server configuration with an addition of openssh-server and puppet. All of the pre-requisites will be installed automatically. The post install script is another one liner designed to download and execute a script in the installer target. By default this script would run under the installers root, but the in-target command performs a chroot operation to the installation target. Please note, that the last line has no explicit line breaks.
tasksel tasksel/first multiselect server
d-i pkgsel/include string openssh-server puppet
d-i pkgsel/update-policy select none
d-i pkgsel/updatedb boolean true
d-i grub-installer/only_debian boolean true
d-i finish-install/reboot_in_progress note
d-i preseed/late_command string in-target wget -O/root/post-install.sh https://stan.borbat.com/downloads/ubuntu-puppet/install/post-install.sh; in-target chmod a+x /root/post-install.sh; in-target /root/post-install.sh
Post Install Scripts
#!/bin/bash

#Upgrade puppet to 2.7.1
mkdir -p /tmp/puppet-upgrade/
cd /tmp/puppet-upgrade
wget "https://stan.borbat.com/downloads/ubuntu-puppet/install/upgrade-puppet.sh"
chmod a+x upgrade-puppet.sh;
./upgrade-puppet.sh

#Configure puppet options
mkdir /etc/default
rm /etc/default/puppet
wget -O/etc/default/puppet "https://stan.borbat.com/downloads/ubuntu-puppet/install/etc-default-puppet"
If you've used puppet with Ubuntu 10.04 LTS before, you have probably noticed that the version in the repository is a little bit out of date. The first part of this script will download another script to update puppet to the newest version. This is entirely optional and depends on your own puppet infrastructure.
The latter part will download the configuaration file to /etc/default/puppet. This is where the configuration for puppet is finally installed. I am instructing it to start during boot time and connect to my puppet master located at "stan.borbat.com".
# Defaults for puppet - sourced by /etc/init.d/puppet

# Start puppet on boot?
START=yes

# Startup options
DAEMON_OPTS="--server stan.borbat.com"
Final Step
After the installation is finished, the VM will reboot and the puppet daemon will attempt to connect to the puppet master. This being the first time the master has seen this server, it will queue it's certificate for acceptance by the administrator. In the final step, one has to simply issue a "puppetca --sign mysql.borbat.com" command on the puppet master accept the new certificate and proceed with the automated configuration by puppet.
