World IPv6 Day
It has been almost a year since the World IPv6 Day of 2011 when Google, Facebook, Yahoo, Akamai and many other major and minor providers enabled connectivity to their servers through IPv6. Overall it was a great success. However the efforts came largely unnoticed because most residential internet service providers have yet to offer IPv6 addressing on their networks.
With the World IPv6 Day of 2012 around the corner, a great deal of ISPs are gearing up to permanently enable native IPv6 connectivity for residential customers. We should start to see this change by June 6th, 2012.
If your website is hosted on shared hosting, you can only go with the flow and hope that your provided enables IPv6 for you. However those of us that are savvy enough to host on dedicated or virtual servers can enable IPv6 connectivity right now.
IPv6 Through IPv4
This tutorial will describe how you can enable IPv6 connectivity through an IPv4 tunnel. This is especially useful if you're ready to participate in the World IPv6 Day but your VPS provider hasn't caught up. As an alternative to native IPv6 connectivity we can form a tunnel using the Hurricane Electrics Free IPv6 Tunnel Broker service.
To get started, you need to create an account on the Tunnel Broker website and then click on the Create Regular Tunnel link. The first field will ask for the IP address of your server. This is the IPv4 address that has been assigned by your VPS provider to your server. If you don't remember what it is, you could always look it up by issuing the ifconfig command.
The rest of the form deals with choosing a tunnel end-point that's closest to you. If you're viewing the HE website from your desktop in all likelihood that location will not be the accurate for your server. To figure out what that form would say if you were checking from your server, issue the following one-liner on your VPS console. wget -qO- "http://anycast.tunnelbroker.net/info.html" | grep -o ".*" | sed 's/]*>//g'
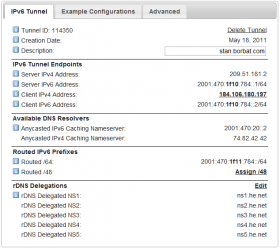
Once you complete the form, Hurricane Electric will assign you a /64 IPv6 subnet and display your tunnel details.
Configuration in Ubuntu

 Now that the tunnel is created on the Hurricane Electrics side, we need to create a matching tunnel on your Ubuntu server. We can do that by adding a few lines to the /etc/network/interfaces file.
These lines will instruct the network configuration scripts to create a new IPv6 tunnel interface and assign it an IPv6 address. See below for the template of the interface settings.
Populate the address field in the interfaces file with the contents of the Client IPv6 Address field.
The Server IPv4 Address field is used to populate the remote and gateway fields in the interfaces file. Just make sure to add two colons in front of the gateway address.
The local field has to be the same as your servers IP address and the Client IPv4 Address on the HE tunnel details page.
Once you have customized and added these settings to the interfaces file, you can instruct the networking init.d script to reload them. /etc/init.d/networking restart
auto he-ipv6
iface he-ipv6 inet6 v4tunnel
    address 2001:470:1f10:784::2
    netmask 64
    remote 209.51.181.2
    gateway ::209.51.181.2
    local 184.106.180.197
    endpoint any
    ttl 64
I highly recommend doing this from the console and having a backup of the original file on hand. If your main interface fail to come up properly due to a configuration error you will want to quickly restore connectivity. Doing so from an SSH session would be impossible because the server will be disconnected from the network.
After you issue the network interfaces have come back up. You can test to see if the tunnel configuration succeeded. One of the simplest network tests is sending an ICMP echo request to some host out there. However the regular ping command will only handle IPv4 addresses. There is however a ping6 command which will do the same for IPv6 hosts.
# ping6 -c3 ipv6.google.com
PING ipv6.google.com(yw-in-x67.1e100.net) 56 data bytes
64 bytes from yw-in-x67.1e100.net: icmp_seq=1 ttl=54 time=119 ms
64 bytes from yw-in-x67.1e100.net: icmp_seq=2 ttl=54 time=119 ms
64 bytes from yw-in-x67.1e100.net: icmp_seq=3 ttl=54 time=119 ms

--- ipv6.google.com ping statistics ---
3 packets transmitted, 3 received, 0% packet loss, time 2019ms
rtt min/avg/max/mdev = 119.012/119.127/119.217/0.407 ms
In the next test we're going to attempt a TCP/IP connection by instructing the telnet command to connect to the IPv6 address. The -6 switch will do just that. To keep the request simple, we're going to request the headers for the http://www.google.com/404 page by issuing the HEAD /404 HTTP/1.0 command and hitting enter twice as soon as we connect.
# telnet -6 ipv6.google.com 80
Trying 2001:4860:800a::93...
Connected to yx-in-x93.1e100.net.
Escape character is '^]'.
HEAD /404 HTTP/1.0

HTTP/1.0 404 Not Found
Content-Type: text/html; charset=UTF-8
X-Content-Type-Options: nosniff
Date: Mon, 26 Mar 2012 02:36:13 GMT
Server: sffe
Content-Length: 934
X-XSS-Protection: 1; mode=block

Connection closed by foreign host.
Conclusion
If you have followed these steps and were able to connect then you're one step closer to enabling IPv6 connectivity for your web services. To allow other people to visit your websites through IPv6 you will also need to to add the AAAA records to your DNS zones.