Posted on by Stan Borbat | Posted in DevOps, Tutorials | Tagged

Having set out to get a broader understanding of the container orchestration landscape. I decided to try the underdog of the solutions: HashiCorp's Nomad. Most new deployments favor Kubernetes, and many complain about its complexity. Nomad promises to be a simpler solution and it has HashiCorp's name behind it. It only requires one executable to run; Two if you deploy it alongside Consul.

All of the final code for this project and deployment instructions are available on GitHub and is tagged v1.0.0 . The master branch will continue to evolve as I add more features. https://github.com/ordenull/terraform-nomad-cluster/tree/v1.0.0

Introduction

The challenge is to build something that could host my blog, if I were to migrate it from DigitalOcean to AWS and over-engineer it to perfection. It currently costs roughly $35 a month for droplets (virtual machines) and another $5 for DNS hosting with DynDns. Let's see how much we can squeeze without blowing up our budget. Many enterprise projects start with an idea and a list of requirements, this one is not going to be any different.

Requirements

  • Provisioned fully with Terraform
  • Can be quickly torn down and rebuilt
  • Running within a Virtual Private Cloud (VPC)
  • Redundancy across multiple availability zones
  • Everything built in auto-scaling groups
  • Load balancer front-end with automatic instance registration
  • SSL used on all external endpoints
  • Easy access to the Nomad Dashboard
  • Secure from the outside and from within
  • Cost roughly $40 a month to operate

Virtual Private Cloud (VPC)

A traditional network architecture calls for a set of public and private subnets. The resources in the public subnets are assigned public IP addresses and communicate with the outside via a gateway. The private resources have to traverse Network Address Translation (NAT). In more restrictive infrastructures, the private resources do not have direct access to the outside networks at all. If they do, that traffic is heavily filtered via proxies and a whitelist maintained by a squad of network engineers.

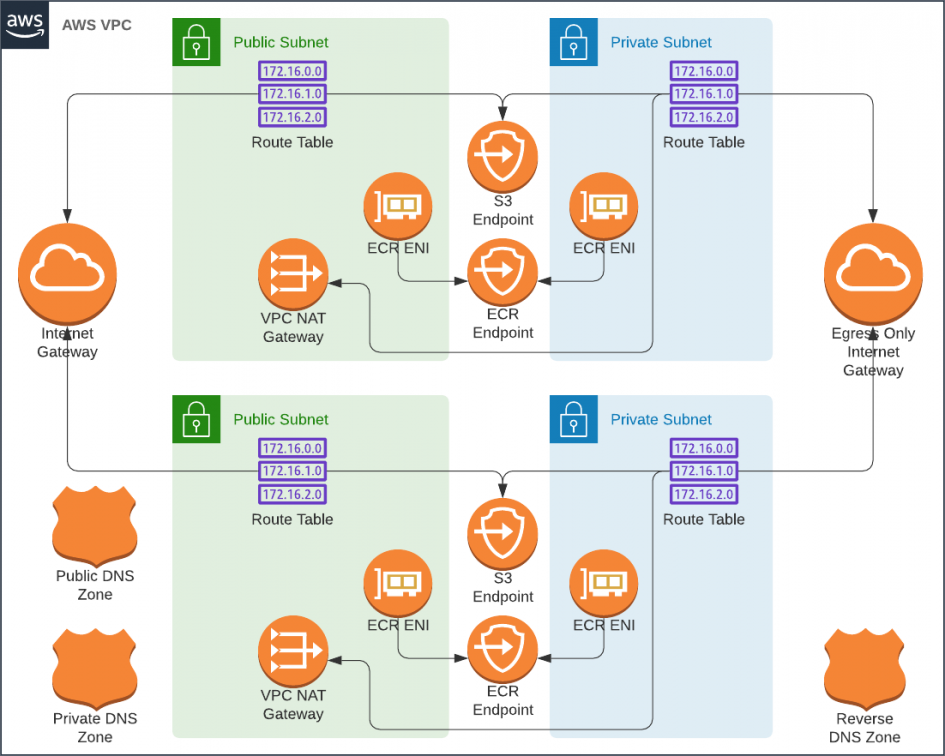
Estimate for a Traditional VPC With Two Availability Zones

  • 1 ✕ VPC [$0]
  • 2 ✕ Public Subnets [$0]
  • 2 ✕ Private Subnets [$0]
  • 3 ✕ Route53 Zones (public, private, reverse) [$2]
  • 2 ✕ NAT Gateways [$66]
  • 2 ✕ Private Link endpoints for S3 [$0]
  • 2 ✕ Private Link endpoint for EC2 [$15]
  • 2 ✕ Private Link endpoint for SSM [$15]
  • 2 ✕ Private Link endpoint for ECR [$15]

Unfortunatley, this would cost a staggering $111 a month to lease; Way over our budget. We can't even afford a single NAT gateways, nor the private link endpoints. What if we were to use an Egress Only Internet Gateway to allow IPv6 connections to the outside world in place of NAT Gateways? I tried, and S3 and HashiCorp were accessible, but the rest of the AWS APIs only worked via IPv4 and would require private link endpoints.

Services Accessible via IPv6 via

  • Packages from amazonlinux.us-east-2.amazonaws.com (via S3 endpoint)
  • Consul and Nomad from HashiCorp (via IPv6)
  • SSM connectivity required as a substitute for a bastion [$15]
  • EC2 endpoint required for nomad and consul node discovery [$15]
  • ECR endpoint required to load Docker images [$15]

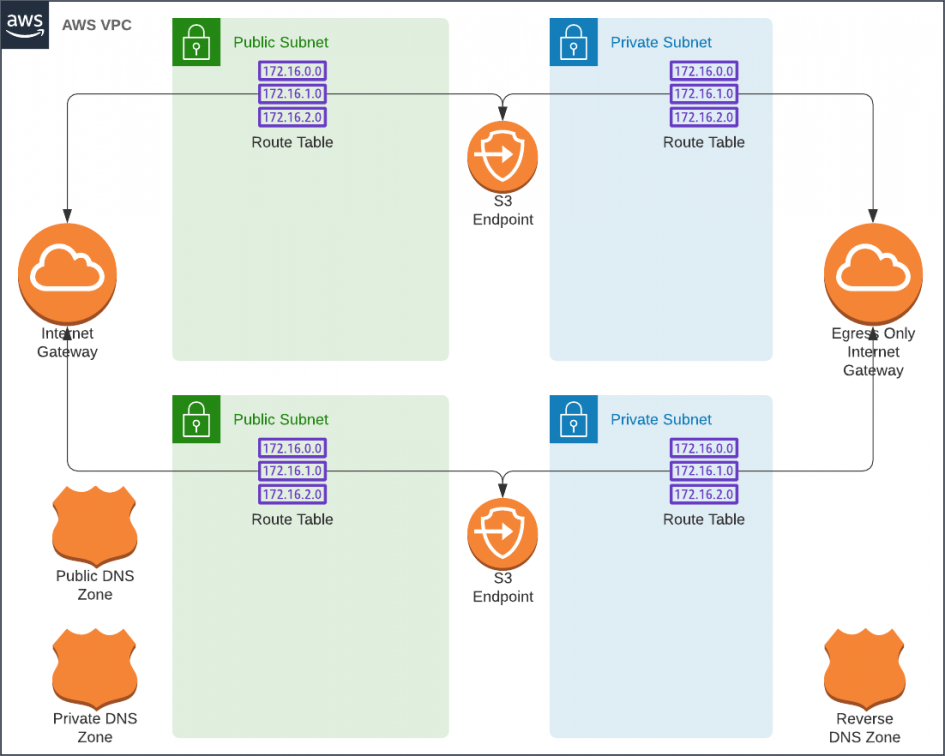
Although we can secure connectivity from the private subnets without NAT Gateways, The Private Link endpoints would still push us over our budget. It's to be noted that it is possible to deploy home baked NAT gateways hosted on t2.nano instances. However, I would rather spend the effort on building a transparent SSL MITM proxy for those subnets. Perhaps in a follow up article.

We're going to deploy our Nomad cluster in the public subnets and sleep easy because it will be protected from unauthorized access by security groups.

We will use a "default" security group to allow all egress from the subnet and to block all ingress except SSH from a list of trusted networks. This group will be attached to all instances in the subnet. Additional security groups will be used to allow various components to talk to one another. In other words, all internal and external connections to the EC2 instances will be blocked by default with exceptions that are required by Nomad's architecture.

Estimate for a Poor Man's VPC With Two Availability Zones

  • 1 ✕ VPC [$0]
  • 2 ✕ Public Subnets [$0]
  • 2 ✕ Private Subnets [$0]
  • 3 ✕ Route53 Zones (public, private, reverse) [$2]
  • 2 ✕ Private Link endpoints for S3 [$0]

Nomad

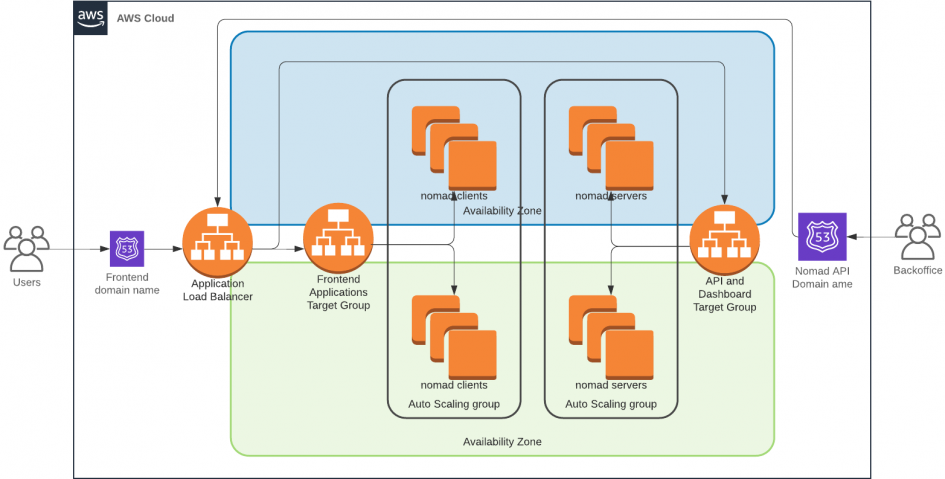
Nomad reference architecture calls for three nomad servers that will be responsible for managing the cluster. A variable number of clients run jobs such as containers. The Nomad servers also expose an API that is used by Terraform to schedule jobs in the cluster. The dashboard is available from the same port.

Although Nomad servers are capable of running without Consul, I found that there's reliability gained with it running alongside. Both Nomad Servers and Nomad Clients will be placed in auto-scaling groups. This will allow me to easily tear the cluster down and re-create it without invoking Terraform. This approach does create a challenge for self-discovery of cluster instances. Each node that's created by the auto-scaling group will not have any information about other nodes that it can use to join the cluster. However both Nomad and Consul can query the EC2 API to discover instances with the same set of tags. We will rely on this.

Estimate for the Nomad Cluster Instances

  • 3 ✕ t2.nano Nomad Servers [$12]
  • 2 ✕ t2.micro Nomad Clients [$15]

Ingress

The next step in our journey is ingress. An Application Load Balancer is going to cost us about $16 a month. I wish it was cheaper, but it's going to be a reasonable purchase. The tradeoff would mean a lot more time spent building the same with Nginx or HA-Proxy. After-all, we need auto-scaling and automatic service registration. Those features would require quite a bit of development effort.

Because we will be relying on a single Application Load Balancer, we will have to somehow separate our private and public endpoints. Among other HTTP request attributes, the listener rules support matching the source IP address of the request. We will use this functionality to allow only our trusted networks to access the Nomad dashboard and the API. The public endpoints will match various virtual hosts and route them containers running on our Nomad clients.

It's important to note that this approach of securing Nomad will only work reliably if you have a static IP address. It also helps to have a VPN server that would allow roaming with that address.

Applications

To test it all, we will run a simple Hello World container. The code for deploying the container is tightly coupled with the infrastructure code and lives in the same codebase. This approach makes it easy to deploy auxiliary components such as Databases, ALB Target Groups and SSL certificates while minding dependencies.

Total Monthly Cost

  • 1 ✕ VPC [$0]
  • 2 ✕ Public Subnets [$0]
  • 2 ✕ Private Subnets [$0]
  • 3 ✕ Route53 Zones (public, private, reverse) [$2]
  • 2 ✕ Private Link endpoints for S3 [$0]
  • 3 ✕ t2.nano Nomad Servers [$12]
  • 2 ✕ t2.micro Nomad Clients [$15]
  • 1 ✕ Application Load Balancer [$16]

$45 + The cost of traffic

Conclusion

We have fulfilled most of our requirements and it has cost us about $45. However we haven't yet accounted for the data transfer costs nor for the Application Load Balancer usage LCU cost. For a large site, I highly recommend placing a CDN such as CloudFront or CloudFlare between the customers and the servers. With a CDN the traffic bill scales as favorably as the performance gain, but only if the content can be cached at the edge.

There are still a few items left lingering. Although our cluster supports auto-scaling, Nomad does not. Each Nomad job is configured to run with a pre-configured number of replicas. There are promises for an improved plugin API that would make it easier to address this deficiency. Meanwhile, I am looking at hooking Consul Watches (web-hooks) into Lambda Functions to accomplish this task.

Although we can now easily run stateless services, my blog is powered by WordPress. This platform requires state to be kept in a MySQL database and on the filesystem. Overcoming this within budget is going to be as big of a challenge as this cluster. Check back soon to see how I'll solve it.

Posted on by Stan Borbat | Posted in DevOps, Reviews, Tutorials | Tagged

Introduction

I host about about a dozen (like eggs™) WordPress websites. Years ago I started with SliceHost, however in 2008 RackSpace acquired SliceHost and a year ago my VM was fully migrated. The migration went smoothly and transparently. At every step, I received an email notifications of data center transitions and finally an invitation to use the RackSpace control panel. Since then my websites have been hosted with RackSpace without any intervention from myself.

However recently with some extra time on my hands I decided to give into the buzz and try Amazon Web Services. It was especially tempting because with their free tier I could test out their RDS (MySQL) and Compute (EC2) services for free. I spent a month automating my infrastructure using Puppet and GIT, so on the migration day all I had to do was install puppet and the server would be built with all of the prerequisites and all of my WordPress sites and their relative database schema would be deployed from their GIT repositories. For small and mostly static WordPress sites, this was an ideal deploy scenario. I migrated and watched my sites response time with Pingdom. The page response time went up. How can it be? I moved from a 512MB instance with a MySQL server running locally to a 512MB instance with a dedicated MySQL (RDS) server.

I decided that before I perform another migration, I need to do some testing. I chose to test four providers Amazon, RackSpace, DigitalOcean and SoftLayer. All four offered comparable prices and some sort of a free tier. Feature-wise, RackSpace and SoftLayer seemed the most enterprise worthy. Both offering support, managed services, dedicated cloud and ability to mix cloud and bare metal resources. Amazon has a wide range of services but little in terms of flexibility and support.

For my operation, I didn't care about support or features outside of running a stable and well performing virtual server. As a matter a fact, my use case was even more narrow. I was hosting WordPress websites on a LAMP stack. I decided to test just that.

Experiment

Servers

Name Provider CPU Clock CPU Cache CPU Bogomips RAM Price
baseline01.xeraweb.net Baremetal with XCP* 3.00GHz 4MB 6000 1GB $40*
digitalocean01.xeraweb.net DigitalOcean 2.3GHz 4MB 4600 1GB $10
rackspace01.xeraweb.net RackSpace 2.6GHz 20MB 5200 1GB $29.2
amazon01.xeraweb.net Amazon EC2 2.00GHz 12MB 4000 1.7GB $43.8
softlayer01.xeraweb.net SoftLayer 2.4GHz 12MB 4800 1GB $50

*Hosted on an HP DL360 G6, spooling softly in my house. Power consumption (NYC Residential) 300 Watt, 40$ monthly, hardware not included.

Installation

Provisioning

All servers were spun up using the web interfaces of their providers. All servers were built with Ubuntu 12.04 LTS 64bit.

Automation

After that the latest version of puppet was installed. Notably this was a manual step, however each provider also offered an API that allowed this step to be automated. However because each of them uses a different API, I decided to spend a few minutes at the command prompt.

sudo -i
wget http://apt.puppetlabs.com/puppetlabs-release-precise.deb
dpkg -i puppetlabs-release-precise.deb
apt-get update
apt-get install puppet

Puppet Manifests

The puppet manifests were constructed to install a local MySQL instance, an instance of Apache with mod_php and a deploy of WordPress. The whole /etc/puppet directory of the Puppet master is available for download from the Puppet WordPress Benchmark GIT Repository. The commit number "a8e5abe6d17d6c51305488ced9307fa49edca3be" was used for this test.

Results

RackSpace and SoftLayer performance was the closest to the baseline and showed almost no neighbor noise despite the test lasting 8 days. DigitalOcean's performance varied erratically, and Amazon was plain sluggish in comparison with the others. The following graph shows the average response time as measured from the same server (bypassing any network overhead). Each step in the graph is an addition of a base installation of WordPress and an HTTP health check for that instance. Since all of the health-checks fire off simultaneously, the number of sites can equate to a number of simultaneous web requests per second and their average response times.

Number of
Websites
Average Homepage Response Time by Provider (Seconds)
Baseline Rackspace Amazon Softlayer DigitalOcean
10.250.200.510.210.37
20.400.350.960.390.57
30.560.491.280.550.76
40.730.651.710.710.84
50.970.852.150.940.95
61.060.952.411.061.06

Web Response Time Home Page Response Time by Cloud Computing Provider

Each step in the response time graph represents an addition of a WordPress instance and it's HTTP health check. This part of the test was done manually i.e. I amended the ordenull::benchmark class and executed puppet agent --test on all of the servers simultaneously. Within 5 minutes each of the servers had added another installation of WordPress.

Average Homepage Response Time by Provider (2013)

Server Load Exponentially Weighted Moving Average Chart of the 15-Minute Server Load Average

cloud-benchmark-2013-load-average-15-ewma

With 6 concurrent HTTP check requests every 15 seconds, the CPU load average is within healthy operating range. I wouldn't consider any of the servers to be overloaded by this test. This of course opens up another mystery. Why am I seeing such a difference in response times?

I thought I would check what metrics are seen from the virtual machine hosts as well. Luckily both Amazon and SoftLayer provided complimentary basic monitoring. These metrics covered CPU Utilization as viewed from the VM Host and a few others. I found the CPU utilization to be the most interesting because it has potential to show another side of the story not seen from inside of the virtual machine. Depending on how the hypervisor allocates it's resources the CPU utilization that's seen from the VM and from the hypervisor could differ (See EC2 Monitoring: The Case of Stolen CPU).

The graphs didn't reveal anything groundbreaking. Amazon's CPU usage has barely reached 25% and SoftLayer was at around 10%. I imagine that if I continued adding WordPress instances until I reached 100%, the differences in response times would fan out even more. Unfortunately I didn't have the patience nor the funds to do that this time around.

cloud-benchmark-2013-amazon-cloud-watch cloud-benchmark-2013-softlayer-cpu-usage

Disk IO Crude comparison of sequential reads and writes to persistent storage

After completing the WordPress response time test, I also performed a basic comparison of IO performance to measure sustained disk IO with 64kb block sizes totaling 1GB. The write test was done with dd if=/dev/zero of=/test bs=64k count=16000 and reads were measured with dd if=/test of=/dev/null bs=64k. I waited 20 minutes between the read and the write tests in hopes that any data cached on the hypervisor side (RAID controllers and SAN) would expire.

Persistent
Disk Operation
Average Throughput of a 1GB Linear Transfer (MB/s)
Baseline Rackspace Amazon Softlayer DigitalOcean
Sequential Write21319534181541
Sequential Read 23632010194517

These results start to better explain the sluggish performance of the Amazon instance in comparison to the baseline. However after 8 days I would expect that the actively read PHP files and MySQL tables would have been cached in RAM by Ubuntu and free -m was showing around 300MB used for caching.

Conclusion

To make a fair comparison, I will divide the providers into two classes - 'Enterprise Worthy' and 'Developer Friendly'. Both RackSpace and SoftLayer's offering is similar and they both provide in-house managed services and support; I will classify them both as Enterprise Worthy. DigitalOcean reminds me of Slicehost. They only offer compute and DNS services but at a great bargain; I classify them as a Developer Friendly. Amazon is somewhere in between; Although they have a service great offering, they lack in-house managed services and their performance doesn't seem to be on par with other providers in this test.

Edited by: Ray Mauge

Posted on by Stan Borbat | Posted in DevOps | Tagged

Introduction

The introduction of solid state disks has changed the hard disk market. SSDs (Solid State Drives) are less prone to failure, and allow much quicker access to the stored data. However the these benefits tend to come at a higher cost. While writing this article a 100 GB SAS (Serial Attached SCSI) SSDs costs around $500. While the same amount of storage on a head and platter disk would cost $50. In a frugal scenario 100 GB is enough room for twenty Ubuntu virtual machines, each using about 3 GB for the operating system and 2 GB the configuration and applications.

Skinnybox - Shared Master Image Diagram Even using LVM (Logical Volume Manager) style thin provisioning it wouldn't be possible to fit many more than twenty of such virtual machines on the same amount of storage. LVM thin provisioning will share untouched free space between virtual machines. In some implementations where VMs are created as snapshots there is also sharing of the untouched allocated blocks. There is however no certainty on what data is shared and for how long. Over-allocating in this scenario would breed enough uncertainty to outweigh the benefits of saving space.

Skinnybox takes a more predictable approach to thin provisioning. The idea came to me while working with OpenWRT, a Linux distribution for embedded devices. OpenWRT uses the overlay file system to merge the base ROM (Read Only Memory) partition, and the writable flash partition of an embedded device. The ROM partition is called the lower partition and the flash is the upper. When a file access is requested, first the overlay driver will search the upper partition; If it doesn't exist there, then it's looked up in the lower partition.

Skinnybox applies the OpenWRT file system approach to virtual machine provisioning. A master, read/only image contains the shared operating system and packages. This image is shared between many virtual machines. Additionally each virtual machine has an image just for it's unique configurations, customization, and run time. With a scenario above, a single 3 GB operating system image would be shared between all of the nodes as the lower overlay mount; Each node would also be presented with it's personal 2 GB upper overlay mount. With such provisioning we would be able to deploy forty eight virtual machines on that single 100 GB disk.

The project is available from the GitHub SkinnyBox Repo

Posted on by Stan Borbat | Posted in Tutorials, Workarounds | Tagged

Sometimes the XenServer VDI delete command will fail with an error message "The attempt to mark the VDI as hidden failed". This is usually a result of corrupt metadata associated with the VDI. I first encountered this error when I mounted a VDI on the control domain to manually re-format it. Unfortunately this didn't work out as well as I expected and left me with a corrupted VDI.

When removing them, the /var/log/messages on the control domain will look similar to this

vhd-util: libvhd::vhd_validate_footer: invalid footer cookie:
vhd-util: libvhd::vhd_read_footer_at: /dev/VG_XenStorage-9ee4c758-cda0-a6b5-a0b8-14ce6d200ff7/VHD-177fbd2b-a093-4c21-8785-46acddecf3e7: reading footer at 0x207ffe00 failed: -22
vhd-util: libvhd::vhd_read: /dev/VG_XenStorage-9ee4c758-cda0-a6b5-a0b8-14ce6d200ff7/VHD-177fbd2b-a093-4c21-8785-46acddecf3e7: read of 512 returned 0, errno: -22
vhd-util: libvhd::vhd_validate_footer: invalid footer cookie:
vhd-util: libvhd::vhd_read_short_footer: /dev/VG_XenStorage-9ee4c758-cda0-a6b5-a0b8-14ce6d200ff7/VHD-177fbd2b-a093-4c21-8785-46acddecf3e7: failed reading short footer: -22
vhd-util: libvhd::vhd_validate_footer: invalid footer cookie:
vhd-util: libvhd::vhd_read_footer_at: /dev/VG_XenStorage-9ee4c758-cda0-a6b5-a0b8-14ce6d200ff7/VHD-177fbd2b-a093-4c21-8785-46acddecf3e7: reading footer at 0x00000000 failed: -22

Invalid footer cookie?

Lucky for me I didn't need that VDI so I decided to force remove it. The easiest way I found was to just remove the logical volume of that VDI with the following command:

lvremove /dev/VG_XenStorage-9ee4c758-cda0-a6b5-a0b8-14ce6d200ff7/VHD-177fbd2b-a093-4c21-8785-46acddecf3e7

The logical volume name is the same one as in the log files. You can also find it with the lvdisplay name and grep for the VDIs uuid.

Posted on by Stan Borbat | Posted in Tutorials | Tagged

World IPv6 Day

It has been almost a year since the World IPv6 Day of 2011 when Google, Facebook, Yahoo, Akamai and many other major and minor providers enabled connectivity to their servers through IPv6. Overall it was a great success. However the efforts came largely unnoticed because most residential internet service providers have yet to offer IPv6 addressing on their networks.

With the World IPv6 Day of 2012 around the corner, a great deal of ISPs are gearing up to permanently enable native IPv6 connectivity for residential customers. We should start to see this change by June 6th, 2012.

If your website is hosted on shared hosting, you can only go with the flow and hope that your provided enables IPv6 for you. However those of us that are savvy enough to host on dedicated or virtual servers can enable IPv6 connectivity right now.

IPv6 Through IPv4

This tutorial will describe how you can enable IPv6 connectivity through an IPv4 tunnel. This is especially useful if you're ready to participate in the World IPv6 Day but your VPS provider hasn't caught up. As an alternative to native IPv6 connectivity we can form a tunnel using the Hurricane Electrics Free IPv6 Tunnel Broker service.

To get started, you need to create an account on the Tunnel Broker website and then click on the Create Regular Tunnel link. The first field will ask for the IP address of your server. This is the IPv4 address that has been assigned by your VPS provider to your server. If you don't remember what it is, you could always look it up by issuing the ifconfig command.

The rest of the form deals with choosing a tunnel end-point that's closest to you. If you're viewing the HE website from your desktop in all likelihood that location will not be the accurate for your server. To figure out what that form would say if you were checking from your server, issue the following one-liner on your VPS console. wget -qO- "http://anycast.tunnelbroker.net/info.html" | grep -o ".*" | sed 's/]*>//g'

Once you complete the form, Hurricane Electric will assign you a /64 IPv6 subnet and display your tunnel details.

Configuration in Ubuntu

Now that the tunnel is created on the Hurricane Electrics side, we need to create a matching tunnel on your Ubuntu server. We can do that by adding a few lines to the /etc/network/interfaces file.

These lines will instruct the network configuration scripts to create a new IPv6 tunnel interface and assign it an IPv6 address. See below for the template of the interface settings.

Populate the address field in the interfaces file with the contents of the Client IPv6 Address field.

The Server IPv4 Address field is used to populate the remote and gateway fields in the interfaces file. Just make sure to add two colons in front of the gateway address.

The local field has to be the same as your servers IP address and the Client IPv4 Address on the HE tunnel details page.

Once you have customized and added these settings to the interfaces file, you can instruct the networking init.d script to reload them. /etc/init.d/networking restart

auto he-ipv6
iface he-ipv6 inet6 v4tunnel
    address 2001:470:1f10:784::2
    netmask 64
    remote 209.51.181.2
    gateway ::209.51.181.2
    local 184.106.180.197
    endpoint any
    ttl 64

I highly recommend doing this from the console and having a backup of the original file on hand. If your main interface fail to come up properly due to a configuration error you will want to quickly restore connectivity. Doing so from an SSH session would be impossible because the server will be disconnected from the network.

After you issue the network interfaces have come back up. You can test to see if the tunnel configuration succeeded. One of the simplest network tests is sending an ICMP echo request to some host out there. However the regular ping command will only handle IPv4 addresses. There is however a ping6 command which will do the same for IPv6 hosts.

# ping6 -c3 ipv6.google.com
PING ipv6.google.com(yw-in-x67.1e100.net) 56 data bytes
64 bytes from yw-in-x67.1e100.net: icmp_seq=1 ttl=54 time=119 ms
64 bytes from yw-in-x67.1e100.net: icmp_seq=2 ttl=54 time=119 ms
64 bytes from yw-in-x67.1e100.net: icmp_seq=3 ttl=54 time=119 ms

--- ipv6.google.com ping statistics ---
3 packets transmitted, 3 received, 0% packet loss, time 2019ms
rtt min/avg/max/mdev = 119.012/119.127/119.217/0.407 ms

In the next test we're going to attempt a TCP/IP connection by instructing the telnet command to connect to the IPv6 address. The -6 switch will do just that. To keep the request simple, we're going to request the headers for the http://www.google.com/404 page by issuing the HEAD /404 HTTP/1.0 command and hitting enter twice as soon as we connect.

# telnet -6 ipv6.google.com 80
Trying 2001:4860:800a::93...
Connected to yx-in-x93.1e100.net.
Escape character is '^]'.
HEAD /404 HTTP/1.0

HTTP/1.0 404 Not Found
Content-Type: text/html; charset=UTF-8
X-Content-Type-Options: nosniff
Date: Mon, 26 Mar 2012 02:36:13 GMT
Server: sffe
Content-Length: 934
X-XSS-Protection: 1; mode=block

Connection closed by foreign host.

Conclusion

If you have followed these steps and were able to connect then you're one step closer to enabling IPv6 connectivity for your web services. To allow other people to visit your websites through IPv6 you will also need to to add the AAAA records to your DNS zones.

Posted on by Stan Borbat | Posted in Health, Orthodontics | Tagged

Introduction

While developing the website for Art of Orthodontics I decided to correct a defect in my own bite. I reviewed several options and narrowed them down to braces, a dual jaw elasto positioner appliance, and clear aligners. Almost initially I ruled out braces because they require more care to keep clean from food. It also helped to know that modern treatment options were feasible in my case.

First I decided to try out the elasto positioner appliance. After the initial consultation, the impressions of my teeth were taken and then sent to the lab to be used to create the polymer mold. I was then to wear the appliance for 14 hours a day for 6 month or longer. Wearing it in my sleep fulfilled the largest part of the 14 hours, however for the other 6 I would have to wear it at work. This proved to be more then mildly inconvenient because with my mouth relaxed I wasn't able to fully close my lips and when I had to speak I would have to discreetly remove the appliance from my mouth. Two weeks later, overwhelmed by the disadvantages of this type of treatment I decided to move on to clear aligners.

After another consultation, my impressions were taken again and sent to another lab. When my OrthoSnap treatment package arrived it included 14 sets of clear aligners. I was to switch to a different set every few weeks until my treatment was complete.

OrthoSnap Attachments

To improve effectiveness of treatment with clear aligners, attachments have to be added to some teeth. These attachments usually come in the shape of small beads and are created from the same composite material that is used for restorations. These beads then provide strong points of leverage to re-position the root of the tooth. The extra grip allows orthodontists to plan and execute more complex movements that would be possible without them. In my case, the installation of two attachments was necessary. The procedure was painless and completed in less then 20 minutes.

First Impression With Clear Aligners

After the attachments were installed and the first set of aligners were slid onto my teeth, I was pleased by their precise fit. Although I wasn't able to experience the feeling of clenching my teeth together, I was able to close my mouth naturally.

My first spoken words while wearing the aligners were "thank you", however to my surprise they came out with a slight lisp. On the second try, I adjusted my mouth and the lisp was gone; It would take me two more days before I could speak without much thought.

There was feeling that something was floating between my molars when my mouth was in a relaxed state. This feeling persisted for three days. On a few occasions it overwhelmed me and I had to remove the aligners for a few hours at a time. Removing them proved to be much trickier then wearing them. The bottom one slid off easily when I gripped it's sides with my fingers and pulled it off. The top aligner was more difficult to remove. I would have to pry at the base of the top incisors with my fingernails to slide it past the two round attachment points.

I removed the aligners before each meal and stored them in a napkin. Napkins however could prove difficult to track in a busy restaurant if a waiter feels the need to tidy up the table between courses.  I highly recommend investing in a dedicated case to store these aligners when they are not in use.

Sleeping with the aligners in place was far easier then with the elasto positioner. It took many nights of waking up and searching for the elasto positioner appliance because my unconscious body decided to remove the foreign object. In contrast, even on the first night wearing the clear aligners I woke up in the morning with them fit snugly around my teeth.

Posted on by Stan Borbat | Posted in Ideas

Often we find ourselves in situations where something that we use is running out. It could be deodorant, toothpaste or just about anything else that comes in a container. There usually is a large variety of products for us to choose from, but I prefer to stick to the same brand if I am satisfied with it. However it's sometimes challenging to find the same exact product a few months down the road. Maybe the store has ran out, maybe they decided to stop carrying it altogether, either way it's no longer available when I need it. At that moment I could choose to compromise and try another product or brand, but I would prefer not to.

I would like to see an application which allows me to scan ordinary barcodes and automatically add the products to my shopping list. I could then choose to re-order and have them delivered to me before they run out.

Posted on by Stan Borbat | Posted in Ideas

If you've ever searched through a jukebox with thousands of songs, you know that it's akin to finding a needle in a haystack. We all have our personal music likes and dislikes, but they might be hard to satisfy while searching through a music collection that's not our own. I propose a jukebox with an iPhone dock port that will let me choose songs from my device then automatically download and queue them, allowing me to take my iPhone and walk away to enjoy the music once it starts playing.

Posted on by Stan Borbat | Posted in Automation, Tutorials | Tagged

Introduction

Citrix XenServer 6.0 now comes with templates for Ubuntu 10.04 LTS. This means that we can now provision Ubuntu servers without having to go through the trouble of cloning and customizing the Debian templates. However in this article we will go one step further and automate the Ubuntu install process up to the point when puppet is ready to take over and do the rest.

Configuration

The first parts of the XenServer new VM wizard allow us to select a template, architecture, name, and description. For the most part they are self explanatory. Just make sure that you select one of the Ubuntu Lucid Lynx 10.04 templates. This tutorial will address the "Locate the operating system installation media" step where we can specify software repository and boot parameters. These boot parameters will be passed to the Ubuntu installer.

To install Ubuntu without needing more human intervention we will need to feed the answers to the installers questions ahead of time. If we provide it enough information the installer will run and finish without requiring any input from us. There are four major requirements for this process - a software repository, keyboard and locale, network configuration, and a preseed file.

Software repository

The software repository can be any repository with all of the packages necessary to perform the installation. If you're planning on deploying many VMs, it's highly recommended to host a mirror on your local network. This way you will save on network bandwidth and installation time. However for this article, we're going to use the Ubuntu hosted repository located at http://archive.ubuntu.com/ubuntu

Keyboard and Locale

Just providing the software repository to the XenServers VM provision wizard is enough to install Unbutu. If you've tried this before then you know that the first questions the Ubuntu installer asks will relate to your keyboard type and locale. Since our goal is to automate this process, we're going to provide answers to these questions as boot parameters. The ones here are for a US English configuration. There are many more supported, and you can find more documentation on locales in the Ubuntu Community Documentation.

console=hvc0  
debian-installer/locale=en_US 
console-setup/layoutcode=us
console-setup/ask_detect=false

Network connection

Next, the installer asks for the network configuration. If you have a DHCP server then you need to just provide the interface, hostname, and domain settings. For a static connection you will also need to provide the network address, netmask, gateway and nameservers. These parameters will configure mysql.borbat.com with a static IP address 192.168.1.201 utilizing the memorable 4.2.2.1 nameserver. The netcfg/get_nameservers parameter is plural, so it probably supports a comma separated list. I haven't tried this yet, but if it works please let me know and I will update this article.

interface=eth0
netcfg/get_hostname=mysql
netcfg/get_domain=borbat.com
netcfg/disable_dhcp=true
netcfg/get_ipaddress=192.168.1.201
netcfg/get_netmask=255.255.255.0
netcfg/get_gateway=192.168.1.1
netcfg/get_nameservers=4.2.2.1

Preseed configuration

Now that we've given the Ubuntu installer enough parameters to set the locale and get on the network, we can provide it a URL of a preseed file that contains the rest of the configuration. The preseed file is a text configuration file with a list of parameters very similar to what we have supplied at boot time. There are many possible parameters that will allow you to customize the installation and the full guide is available in the Ubuntu Preseeding documenation.

preseed/url=https://stan.borbat.com/downloads/ubuntu-puppet/install/preseed-10.04-LTS-clean.cfg

After Ubuntu installer is able to connect to the network, it will attempt to download this file and use the configuration to complete the rest of the installation. For this tutorial I hosted my preseed file on an Apache Web Server at the following URL https://stan.borbat.com/downloads/ubuntu-puppet/install/preseed-10.04-LTS-clean.cfg. This could be any web server as long as it's accessible on the network using the parameters that you specified above.

Installation

All of these parameters need to be put together into a single line and separated by spaces like in this text file. The end result can then be pasted into the Boot Parameters text box of the VM installation wizard.

The following steps will ask you to choose a home server; configure the network adapters, disk drives, and resources. It's important to make sure that the network card configuration corresponds to your boot parameters. If you configured eth0 in your boot parameters then you need to also make sure that the first network card is on the correct network segment to access the repository and the preseed file.

When the wizard is finished, the resources for the VM will be allocated and it will be spun up. You can monitor the installation progress through the console. If everything was configured correctly then the installer will not ask any questions during the installation and will eventually end with your VM login screen. By that point it would have also connected to your puppet server and presented a new authentication certificate.


Customization for Puppet

Yet one important question probably remains on your mind. How is the new installation aware of my puppet server? The answer lies in the preseed file. So now we will go through it and help you customize it to fit your environment.

Preseed File

The first section specifies the package repository. This setting should be the same as what you provided to the XenServer wizard. It's just broken up into two parts, the hostname and the directory.

d-i mirror/country string manual
d-i mirror/http/hostname string archive.ubuntu.com
d-i mirror/http/directory string /ubuntu
d-i mirror/http/proxy string

The next section specifies your clock settings. Although often overlooked, it's important to set this and avoid debugging issues in the future. Some hardware such as HP Blades have issues with clock drift. Although they can be addressed with proper kernel parameters, it's simpler to just provide a time server and move on to bigger things.

d-i clock-setup/utc boolean true
d-i time/zone string US/Eastern
d-i clock-setup/ntp boolean true
d-i clock-setup/ntp-server string 0.pool.ntp.org

This following section describes how the drive is partitioned. Here we're telling the installer to use the "atomic" configuration. The full drive will be allocated to the root partition and formatted with ext3. The rest of the settings are to answer the standard questions that the installer will asks. Is it ok to overwrite? Since we're provisioning a new VM, the answer will always be yes.

d-i partman-auto/method string regular
d-i partman-auto/choose_recipe select atomic
d-i partman/default_filesystem string ext3
d-i partman/confirm_write_new_label boolean true
d-i partman/choose_partition select finish
d-i partman/confirm boolean true
d-i partman/confirm_nooverwrite boolean true

Although I choose to leave all the user and authentication configuration to my puppet scripts. This section allows me to specify a default root password and to decline to create a new user. In this configuration, the root password is set to be "mypassword". It's simple, but not always secure enough. For instance, an attacker could find my preseed file and read my default password in clear text. This would give him an opportunity to sign into a newly provisioned server before puppet has a chance to update the security configuration. Alternatively you could provide a hashed password here.

d-i passwd/root-login boolean true
d-i passwd/make-user boolean false
d-i passwd/root-password password mypassword
d-i passwd/root-password-again password mypassword
#d-i passwd/root-password-crypted password [MD5 hash]
d-i user-setup/allow-password-weak boolean true
d-i user-setup/encrypt-home boolean false

The last section allows us to choose packages and most importantly specify a post-install script. I am installing a server configuration with an addition of openssh-server and puppet. All of the pre-requisites will be installed automatically. The post install script is another one liner designed to download and execute a script in the installer target. By default this script would run under the installers root, but the in-target command performs a chroot operation to the installation target. Please note, that the last line has no explicit line breaks.

tasksel tasksel/first multiselect server
d-i pkgsel/include string openssh-server puppet
d-i pkgsel/update-policy select none
d-i pkgsel/updatedb boolean true
d-i grub-installer/only_debian boolean true
d-i finish-install/reboot_in_progress note
d-i preseed/late_command string in-target wget -O/root/post-install.sh https://stan.borbat.com/downloads/ubuntu-puppet/install/post-install.sh; in-target chmod a+x /root/post-install.sh; in-target /root/post-install.sh

Post Install Scripts

#!/bin/bash

#Upgrade puppet to 2.7.1
mkdir -p /tmp/puppet-upgrade/
cd /tmp/puppet-upgrade
wget "https://stan.borbat.com/downloads/ubuntu-puppet/install/upgrade-puppet.sh"
chmod a+x upgrade-puppet.sh;
./upgrade-puppet.sh

#Configure puppet options
mkdir /etc/default
rm /etc/default/puppet
wget -O/etc/default/puppet "https://stan.borbat.com/downloads/ubuntu-puppet/install/etc-default-puppet"

If you've used puppet with Ubuntu 10.04 LTS before, you have probably noticed that the version in the repository is a little bit out of date. The first part of this script will download another script to update puppet to the newest version. This is entirely optional and depends on your own puppet infrastructure.

The latter part will download the configuaration file to /etc/default/puppet. This is where the configuration for puppet is finally installed. I am instructing it to start during boot time and connect to my puppet master located at "stan.borbat.com".

# Defaults for puppet - sourced by /etc/init.d/puppet

# Start puppet on boot?
START=yes

# Startup options
DAEMON_OPTS="--server stan.borbat.com"

Final Step

After the installation is finished, the VM will reboot and the puppet daemon will attempt to connect to the puppet master. This being the first time the master has seen this server, it will queue it's certificate for acceptance by the administrator. In the final step, one has to simply issue a "puppetca --sign mysql.borbat.com" command on the puppet master accept the new certificate and proceed with the automated configuration by puppet.